


Why Is Your HIWIN Linear Slider Binding After Rail Installation?
If your HIWIN Linear slider moved smoothly before installation but now binds on the rail, replacing the carriage may not solve the problem. The change often points to mounting-surface errors, rail misalignment, uneven bolt tightening, or contamination introduced during assembly. Forcing movement can damage rolling elements and raceways, turning a correctable installation issue into costly downtime.
The useful question is not simply whether the carriage feels tight. It is which assembly step introduced the resistance. A rail that runs freely with its bolts lightly seated, then develops a tight spot after final tightening, gives a different diagnostic clue from an axis that binds only after the carriage plate is attached.
Identify what “binding” actually feels like
Isolate electrical power, release stored energy, and support any load that could move unexpectedly. A vertical axis needs positive mechanical support before disconnecting its drive or loosening mounting fasteners. Do not use servo torque to push through a suspected mechanical obstruction.
Where the machine design permits safe manual movement, note whether resistance is uniform, position-dependent, or intermittent. Mark the tight location against the machine base. Record whether it appeared after rail tightening, carriage mounting, drive connection, or lubrication.
- Uniform resistance: investigate seal drag, preload specification, lubricant condition, or external load. A preloaded carriage is not expected to coast like a loose bearing.
- A tight spot at a repeatable rail position: inspect local mounting distortion, a damaged raceway, debris, or interference near that location.
- Resistance only with both rails connected: check parallelism, relative rail height, and carriage-plate geometry.
- Grinding, catching, or an abrupt stop: stop testing and inspect for contamination or internal damage.
These patterns guide inspection; they are not proof by themselves. A seal contacting a damaged cover strip, for example, can imitate a raceway problem.
Separate guide resistance from drive resistance
A stiff complete axis does not automatically mean a faulty linear guide. If the machine’s service procedure allows it, isolate the guide assembly from the ball screw, belt, coupling, brake, or actuator. Support the moving assembly before disconnecting anything.
If resistance disappears with the drive disconnected, inspect screw alignment, the ball-nut bracket, support bearings, and coupling position. If it remains, continue with the rails and carriage mounting. This separation prevents replacing a good guide because another component is transmitting load into it.
Ball-screw support bearings deserve their own checks. The INA ZKLF3080-2RS Axial-super Precision Bearing, listed under model ZKLF3080-2RS-XL, belongs to that separate bearing discussion—not to carriage replacement. Confirm its exact dimensions, preload arrangement, and manufacturer specification against the machine drawing; do not assume general precision-grade or clearance options apply to this particular assembly.
Check what the rail is being pulled against
A guide rail can follow imperfections in its mounting seat when bolts pull it down. Burrs around tapped holes, paint, trapped chips, raised edges, or an uneven shoulder can therefore create binding even when the rail looked straight before installation.
With the assembly safely unloaded, inspect the seating surface using the measuring method specified for the machine. A dial indicator can help map variation, but its reference must be trustworthy. An indicator carried by the same distorted assembly may conceal the error you are trying to measure.
Check the shoulder corner too. If the base fillet interferes with the rail’s corner relief, the rail may not sit fully against both reference faces. Tightening harder will not correct that geometry.
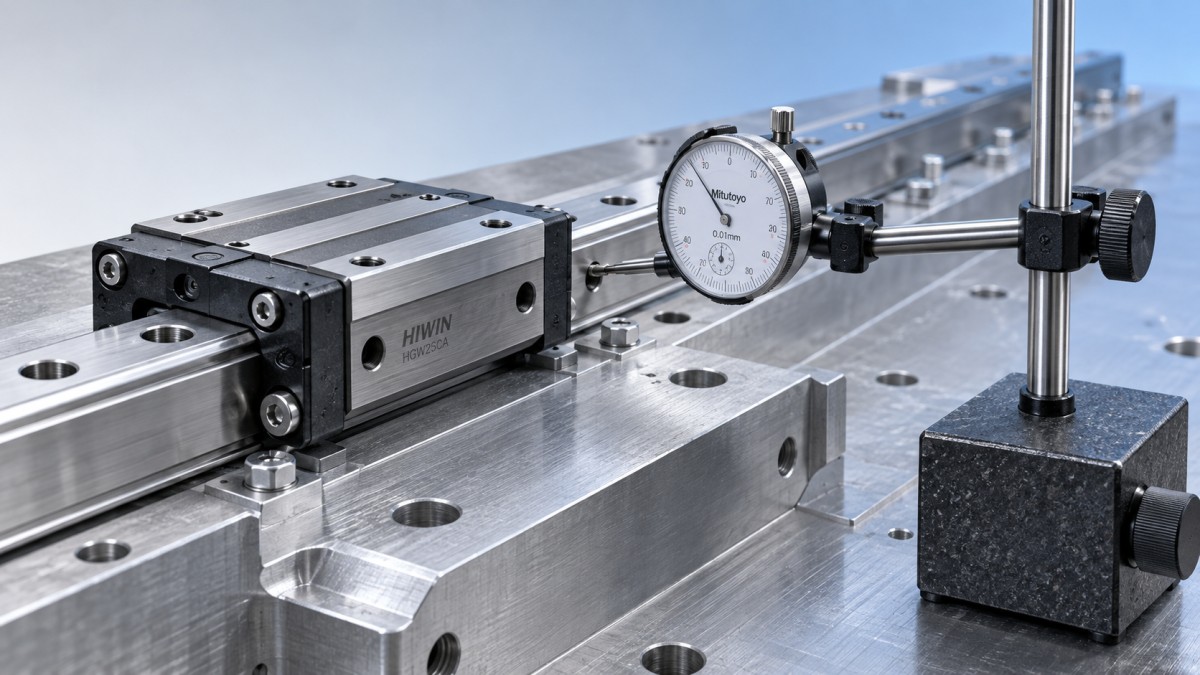
After recording the original condition, a controlled reduction of mounting constraint may help locate distortion. Only loosen fasteners with the load supported and according to the service procedure. If local resistance changes when a particular rail section is released, inspect that seating area and fastening arrangement. This is a diagnostic check, not permission to operate with loose bolts.
Use the applicable HIWIN installation instructions for bolt torque, tightening sequence, and mounting tolerances. There is no universal torque value for every rail size, bolt grade, and base material. Also check bolt length: a bolt bottoming in a blind hole can register tightening torque without clamping the rail correctly.
When individual carriages run freely but the assembled table does not
This pattern points toward an overconstrained assembly. Two rails may look parallel while differing in lateral alignment, height, or twist. A rigid carriage plate then forces the blocks to accommodate an error they were not intended to absorb.
Identify the specified reference rail and datum face. Verify that rail first, then align the secondary rail using the manufacturer’s recommended method. Do not assume both rails should be independently forced against machined shoulders; the correct arrangement depends on the machine design.
Inspect the underside of the carriage plate for burrs and flatness errors. If tightening its bolts introduces resistance, investigate mounting-pad geometry, rail height differences, and fastening sequence before blaming the blocks. Pulling a warped plate flat through the carriages can introduce unwanted internal loading.
Do not add arbitrary shims or reduce bolt torque until movement feels acceptable. A shim may be appropriate under an engineered correction procedure, but an improvised adjustment can trade binding for poor support or loss of positioning accuracy.
Inspect contamination without creating another failure
Assembly debris can enter around the seals or remain on the rail. Inspect accessible raceways, wipers, lubrication fittings, and rail-hole caps. Look for scoring, displaced seals, and chips near the point where resistance begins.
Clean exposed surfaces with a suitable lint-free material and an approved cleaning agent. Do not direct compressed air into the carriage or flush its internals casually with solvent. Both can move contamination deeper or compromise lubrication.
Lubricate according to the exact series instructions. More grease is not an alignment correction. If carriage removal is necessary, use the specified transfer rail or retaining device; unsupported removal can release rolling elements on designs that require retention.
Decide whether correction or replacement is justified
Replacement becomes reasonable when inspection identifies raceway damage, damaged rolling elements, failed recirculation components, or persistent abnormal resistance after mounting and lubrication conditions have been verified. Check rail-and-block compatibility, accuracy class, and preload designation before ordering; interchangeability depends on the product series.
Jinan Lanyu manufactures bearings and handles bearing import and export, including deep groove ball bearings, self-aligning ball bearings, and cylindrical roller bearings. For a troubleshooting enquiry, the useful information is the full installed designation, machine arrangement, and the step that introduced binding—not simply “the bearing is tight.” Different bearing and guide arrangements require different checks.
After correction, verify the full stroke with fasteners at specified torque, then follow the machine’s controlled return-to-service procedure. Record travel resistance under consistent conditions and check again with the intended load. Smooth movement with mounting bolts loose is not a completed repair; smooth, repeatable travel in the finished assembly is the relevant result.
Navigation
Send Us A Message
consult

Jinan Lanyu Import & Export Co., Ltd. is a bearing manufacturing enterprise specializing in the import and export trade of bearings. Covering a total area of 50,000 square meters, the company boasts an annual production capacity exceeding 20 million sets and is dedicated to the manufacture of high-quality bearings.

First class quality service and professional after-sales team.
Get in Touch
*We respect your confidentiality and all information are protected.
